HOME   ABOUT   EVENTS   BOOKS   SHOP   RECIPES   LINKS

Showing posts with label Clear Jel. Show all posts

Four Berry Pie Filling

Four Berry Pie Filling                                                              
Processing: Boiling Water Bath 30mins
Storage: 12 months+
Yield: 6 cups

   
Now you can make delicious homemade fruit pies in minutes! A quart jar is the perfect size for a family-sized pie, or makes pint (or half-pint) jars for single pies if you have a pie maker.  If you use big jars, you can make extra fruit pies and then freeze them. Jars of pie filling are also good on pancakes, ice-cream, cheesecake and baked cakes too.                
   
Ingredients:                                                                                                                                                
¼ cup ClearJel (regular/cook-type) - do not substitute (do not use any other flour/thickener)
1 cup cold water                                
3 tablespoons bottled lemon juice                                                                                                            ¾ cup white sugar                                                                                                 
1kg (2.2lbs) mixed berries (fresh, blanched; or frozen - thaw and no liquid)
                                                  
Prepare jars.
Prepare jars by covering in water and boiling for 10 minutes.
  
Make pie filling.
In a large, heavy-based pan, measure the water and bottled lemon juice into the pan. Whisk the ClearJel in very well, then stir in the sugar and whisk well. Heat on medium (whisking well every few minutes) while the sugar dissolves. Thicken slightly for a minute or two, whisking well to remove any clumps. Pour the berries into the mixture (refrigerate or freeze the leftover juice from draining the berries). Stir gently. Heat for a few minutes, stirring occasionally, until bubbly and thick, and then turn the heat off.

  
Prepare lids.
While you are making the pie filling, place the lids into a pot of previously boiling water. Do not simmer or boil, just let the lids heat through in the few minutes while you make the pie filling and then fill the jars, removing the lids from the hot water when you are ready to place them onto the jars to seal.

Ladle hot pie filling into hot jars.
Immediately spoon hot pie filling into hot jars, leaving a 1 inch (2.5cm) headspace. Wipe rims and seal.

  
Boiling water bath processing.
Process in hot water bath canner for 30 minutes. Start your timer when the water returns to a full boil. Then when the time is off, turn heat off and rest jars in water for 5 minutes before placing onto a towel-covered bench overnight to cool.

  
Next day: check for seals.
Check jars have sealed before labelling and storing in a cool, dry and dark place for up to 12 months. Jars should not flex up or down when pressed, if jars have not sealed refrigerate immediately or reprocess.

  
For more photos of the four berry pie filling process, visit HERE

Cinnamon Apple Pie Filling

Cinnamon Apple Pie Filling
Day Two Hundred and Ninety Seven (13.03.2013)
Processing: Boiling Water Canner 25mins (half-pints, pints, quarts)
Storage: 12 months +
Yield: 25 cups
     
Delicious apple pie filling - using locally grown apples and cinnamon. Once you've made some jars of pie filling, you simply pour into a pie shell, cover with top and bake. Quart (950ml) jars are great for family-sized pies; half pint (1-cup) jars of canned pie filling make approx 3 x mini snack pies. Pie filling is also delicious stirred through homemade yoghurt or used as a topping on cheesecake, pastries, pancakes, ice-cream or other desserts.
    
Ingredients:
4 1/2kg (10 pounds) firm, ripe apples
water
5 1/2 cups sugar
1 1/2 cups Clearjel
2 cups room temperature water
8 cups of apple cooking water (or apple juice)

2 teaspoons ground cinnamon (or infuse with cinnamon stick instead, remove before canning)
3/4 cup bottled lemon juice
   
Prepare jars.
Prepare jars by covering in water and boiling for 10 minutes.
   
Prepare apples.
Wash, peel and core apples. Cut into thick 1/2 inch (1cm) thick slices. Place apple slices into a bowl of water (with half a lemon squeezed in the water) to prevent browning while you prepare the rest of the apples.
   
Heat apples 1min.
Using a slotted spoon, place 6 cups of apple slices into a wide pan, cover with water and bring to a boil. Boil apple slices for 1 minute, then use the slotted spoon to remove to a bowl, cover bowl and repeat with remaining apple slices in the pan. Keep cooking liquid to use in the recipe.


Combine sugar, ClearJel and 2 cups cool water.
Measure sugar, ClearJel and 2 cups of room-temperature water. Use cool water so the ClearJel doesn't clump. Add ground cinnamon. Whisk well. Stir in 8 cups of apple cooking water (or apple juice if you wish). Whisk well to combine then heat until bubbling and thick. Stir in the bottled lemon juice.
   
Prepare lids.
While you are heating the pie filling, place the lids into a pan of previously boiling water. Do not simmer or boil, just let the lids heat through in the few minutes while you make the pie filling, removing the lids from the water when you are ready to place them onto the jars to seal.
    
Stir in apple slices and fill hot jars with hot pie filling.
Immediately stir the drained apple slices into the pie filling, and bottle straight away into the hot jars, filling to 1 inch (2.5cm) headspace. Carefully bubbles, wipe rims and seal.
   
Boiling water canner processing.
Process in boiling water bath canner for 25 minutes (start timer once water returns to a full boil). When time is up, turn heat off and rest jars in water for 5 minutes before placing onto a towel-covered bench overnight to cool.
     
Next day: check for seals.
Check jars have sealed before labelling and storing in a cool, dry and dark place for up to 12 months.

   
For more photos of this recipe, visit HERE

Vanilla Bean Apple Pie Filling

Vanilla Bean Apple Pie Filling
Day Two Hundred and Ninety Six (12.03.2013)
Processing: Boiling Water Canner 25mins (half-pints, pints, quarts)
Storage: 12 months +
Yield: 25 cups
               
Delicious apple pie filling - using locally grown apples and infusing with vanilla bean. Once you've made some jars of pie filling, you simply pour into a pie shell, cover with top and bake. Quart (950ml) jars are great for family-sized pies; half pint (1-cup) jars of canned pie filling make approx 3 x mini snack pies. Pie filling is also delicious stirred through homemade yoghurt or used as a topping on cheesecake, pastries, pancakes, ice-cream or other desserts.
         
Ingredients:
4 1/2kg (10 pounds) firm, ripe apples
water
5 1/2 cups sugar
1 1/2 cups Clearjel
2 cups room temperature water
8 cups of apple cooking water (or apple juice)

1 vanilla bean (or 1 teaspoon vanilla bean paste)
3/4 cup bottled lemon juice    
    
Prepare jars.
Prepare jars by covering in water and boiling for 10 minutes.       
     
Prepare apples.
Wash, peel and core apples. Cut into thick 1/2 inch (1cm) thick slices. Place apple slices into a bowl of water (with half a lemon squeezed in the water) to prevent browning while you prepare the rest of the apples.
     
Heat apples 1min.
Using a slotted spoon, place 6 cups of apple slices into a wide pan, cover with water and bring to a boil. Boil apple slices for 1 minute, then use the slotted spoon to remove to a bowl, cover bowl and repeat with remaining apple slices in the pan. Keep cooking liquid to use in the recipe.


Combine sugar, ClearJel and 2 cups cool water.
Measure sugar, ClearJel and 2 cups of room-temperature water. Use cool water so the ClearJel doesn't clump. Add scraped vanilla bean and pod. Whisk well. Stir in 8 cups of apple cooking water (or apple juice if you wish). Whisk well to combine then heat until bubbling and thick. Remove empty vanilla bean pod. Stir in the bottled lemon juice.
  
Prepare lids.
While you are heating the pie filling, place the lids into a pan of previously boiling water. Do not simmer or boil, just let the lids heat through in the few minutes while you make the pie filling, removing the lids from the water when you are ready to place them onto the jars to seal.
      
Stir in apple slices and fill hot jars with hot pie filling.
Immediately stir the drained apple slices into the pie filling, and bottle straight away into the hot jars, filling to 1 inch (2.5cm) headspace. Carefully bubbles, wipe rims and seal.
     
Boiling water canner processing.
Process in boiling water bath canner for 25 minutes (start timer once water returns to a full boil). When time is up, turn heat off and rest jars in water for 5 minutes before placing onto a towel-covered bench overnight to cool.
   
Next day: check for seals.
Check jars have sealed before labelling and storing in a cool, dry and dark place for up to 12 months.
       
For more photos of this recipe, visit HERE

Day 68: Butterscotch Sauce

Butterscotch Sauce
    
Day Sixty-Eight (27.07.2012)
Processing: Hot Water Bath Canner 15 minutes (half-pints & pints)
Yield: 4 x half-pints (4 cups) per batch
Recipe Source: 365 Days of Creative Canning

  
About a week ago I canned Chocolate Sauce (recipe HERE), and I took inspiration from that recipe today when I was experimenting with the process, seeing if it was possible to make a caramel-flavoured sauce that was shelf-stable. Caramel sauce is usually white sugar/water/brown sugar/cream whereas butterscotch sauce is usually brown sugar/butter/cream/vanilla - both are NOT shelf stable as dairy CANNOT be canned. So following the method for the Chocolate Sauce but changing the sugars/cooking time, could I make a caramel sauce? The short answer was no, but I happily ended up with a sauce tasting exactly like butterscotch - yet without using the butter or cream, which was great news! I will add that when canning, you can often change the type of sugar, but the quantity/proportions of all ingredients should be kept the same to ensure it is still shelf stable. If you are unsure of any recipe, please ask an expert first - to keep you and your family safe :(^_^):
   
Now what can you do with this rich, smooth lovely sauce you may ask? Well I drizzled half a teaspoon over each chocolate cupcake alongside some homemade honeycomb pieces (recipes will be added soon to the website). You can enjoy a drizzle over pancakes for something sweet, over ice cream or atop a cheesecake, perhaps? Let me know what you create!
   
Pre-heat jars
For each batch, you'll want to pre-heat your half pint or pint jars by covering in boiling water and boiling for 10 minutes. Simmer seals and rings covered in water for 10 minutes.


Combine everything (except the Clear Jel)
In a medium pot whisk together the water, sugars, vanilla extract, kosher salt and golden syrup. Bring to a boil. 
   
   
Simmer and reduce
Bring to a simmer, stirring occasionally, for about 10-15 minutes until the sauce has thickened to a consistency you like. It won't be thick like pie filling with Clear Jel - it should be smooth and pour in a thick stream off the spoon (like honey).
      
Add Clear Jel, in batches, to thicken sauce
Whisk 2 or 3 tablespoons of Clear Jel into 1/4 cup of room temperature water, whisking quickly and continually until smooth. Add into the bubbling sauce, whisking well until sauce is smooth. Continue simmering sauce for a few minutes, adding extra Clear Jel/water mixture in small amounts until you reach the honey consistency. I used about 1 cup of Clear Jel in total for my batch.

Ladle sauce into jars
You'll definitely need a funnel with this recipe, it can get very sticky and messy! Ladle hot sauce into hot jars, to a 1/4 inch (0.5cm) headspace. Remove any bubbles, adding extra sauce if required to correct headspace.

   
Prepare jars
As the rims of the jars will be sticky, wipe with a clean, damp cloth then wipe dry with a clean, dry cloth or paper towel. Add seals to centre of jars and tighten rings to fingertip-tight.

     
Processing
Place into hot water bath canner, water should cover the top of the jars by 1-2 inches (3-5cm). Add canner lid and put onto high head. Process in hot water bath canner for 15 minutes. by bringing to a boil and then starting your timer once it has begun boiling, and keep the water boiling during this time. Once you have finished processing, turn off the heat and remove jars after 5 more minutes to a teatowel-covered bench to rest overnight. The next day check jars have sealed: they shouldn't flex up and down when pressed in the centre. If jars haven't sealed, refrigerate or re-process. For sealed jars, remove bands, label and store in a cool, dark place for up to 12 months. I made 4 half-pints of butterscotch sauce following this recipe.

    
Ingredients:

1 1/2 cups water

2 cups brown sugar (tightly packed)
1 cup white sugar
1 vanilla bean, scraped (or 1 tablespoon vanilla extract)
1 teaspoon kosher salt
2 tablespoons golden syrup  
1 cup Clear Jel (cook type, not instant)
3/4 cup water, extra
    
Variations: Adults only version: add a nip of liqueur ie. butterscotch schnapps.
   
Gift ideas: give a jar of butterscotch sauce with a cookbook; alongside some fresh strawberries; some waffles/maple syrup/chocolate sauce perhaps; or with a jar of our "chocolate cupcakes in a jar"? Wrap jars with some nice ribbon and a pretty teaspoon, too - how about a gift basket with ice cream cones, waffles, assorted sprinkles/candy and a jar of homemade butterscotch sauce and chocolate sauce, sounds like the BEST gift! :(^_^):

   
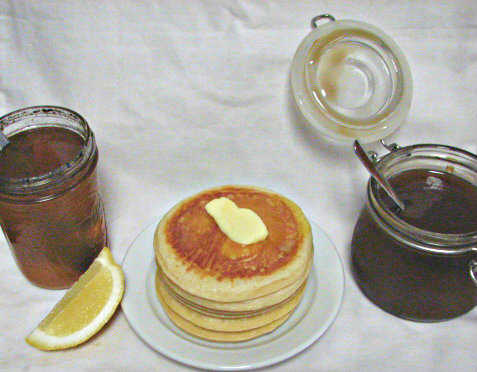
fresh pancakes w. lemon vanilla honey syrup or butterscotch sauce - YUM!
Acknowledgement 
Kaya Wanjoo. Food Preserving kaditj kalyakoorl moondang-ak kaaradj midi boodjar-ak nyininy, yakka wer waabiny, Noongar moort. Ngala kaditj baalap kalyakoorl nidja boodjar wer kep kaaradjiny, baalap moorditj nidja yaakiny-ak wer moorditj moort wer kaditj Birdiya wer yeyi.
Hello and Welcome. Food Preserving acknowledges the Traditional Custodians of the land on which we live, work and play, the Nyoongar people. We recognise their connection to the land and local waterways, their resilience and commitment to community and pay our respect to Elders past and present.
 
Copyright © 2026 Megan Radaich. All rights reserved.
Except as permitted under the Australian Copyright Act of 1968, no other part of this website may be reproduced or utilised in any form by any means, electronic or mechanical, including photocopying, recording, or by any information storage and retrieval system without written permission from the author. Disclaimer